Wibble have been using a hugely powerful tool in their web design and development processes for around five years now called Advanced Custom Fields (ACF) – it is an advanced tool for WordPress developers “to take full control of your WordPress edit screens & custom field data”.
We do not start a web site design and development process without considering the role that ACF will play in the project – we have repeatedly said that ACF was the tool that made WordPress the CMS of choice for us as a studio as it took WordPress from a simple blogging set up to a full blown content management system.
ACF and Gutenberg
Wibble have been blogging and experimenting with Gutenberg for quite some time now, we wrote posts on The Gutenberg Editor, coming with WordPress 5.0 and also on Gutenberg: An Overview of the Interface to cover a number of the new features that were being brought into WordPress with the move to 5.0.
Since October 2018, ACF has been promising the release of ACF Gutenberg Blocks. This looks to be a big deal. It’s been available in numerous ACF 5.8 beta versions, and it will be released officially for the 5.8 release. Hopefully this is soon, as this feature is definitely needed. The current process to create a custom Gutenberg Block is difficult. You need to have experience with React and Javascript, which most PHP developers may struggle with.
At Wibble, we’ve created many Gutenberg Blocks using React, but it’s not easy. Things like create-guten-block make the process more straight-forward, but even with that, it’s quite a learning curve to use. You’ll need to spend some time getting familiar with React, JSX, ES6 Javascript and figuring out how Gutenberg Blocks function.
By using what ACF is proposing, the amount of Javascript required becomes 0. This would suit current WordPress developers, who may only have limited experience with jQuery and basic Javascript skills. Moreover, it’s just an easier process. It’s quicker to implement, which means you can focus on building something rather than setting up custom Gutenberg Block and fighting with React.
Register a Block
The process for setting up an ACF Gutenberg block is fairly simple. I’ve outlined this below:
Time needed: 1 hour and 30 minutes.
Creating Gutenberg Blocks using Advanced Custom Fields (ACF) 5.8 Beta
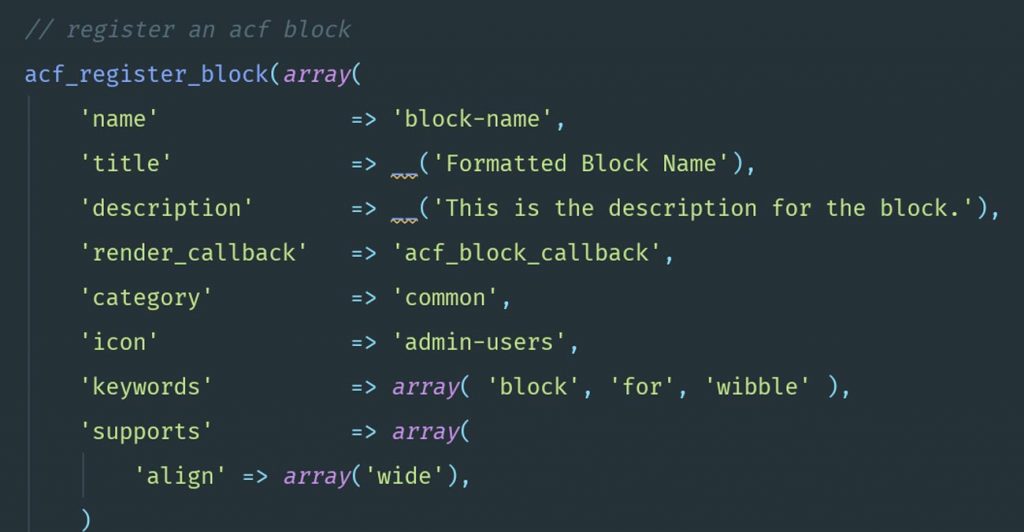
- Register an ACF Block
First off, you’ll need to make sure you’re running the ACF 5.8 Beta. This is required for now if you want to experiment with ACF Blocks. Once that’s in place, you’ll start by registering your block.
You’ll need to start with using acf_register_block(); This is a function that’s similar to the register_post_type() function, you’ll need to specfiy some key values. This includes: name, title, description, render_callback, category, mode, icon, keywords and supports.
These values line up with the WordPress documentation for creating custom Gutenberg blocks, so if you’re not sure about the values, you can actually refer to that. 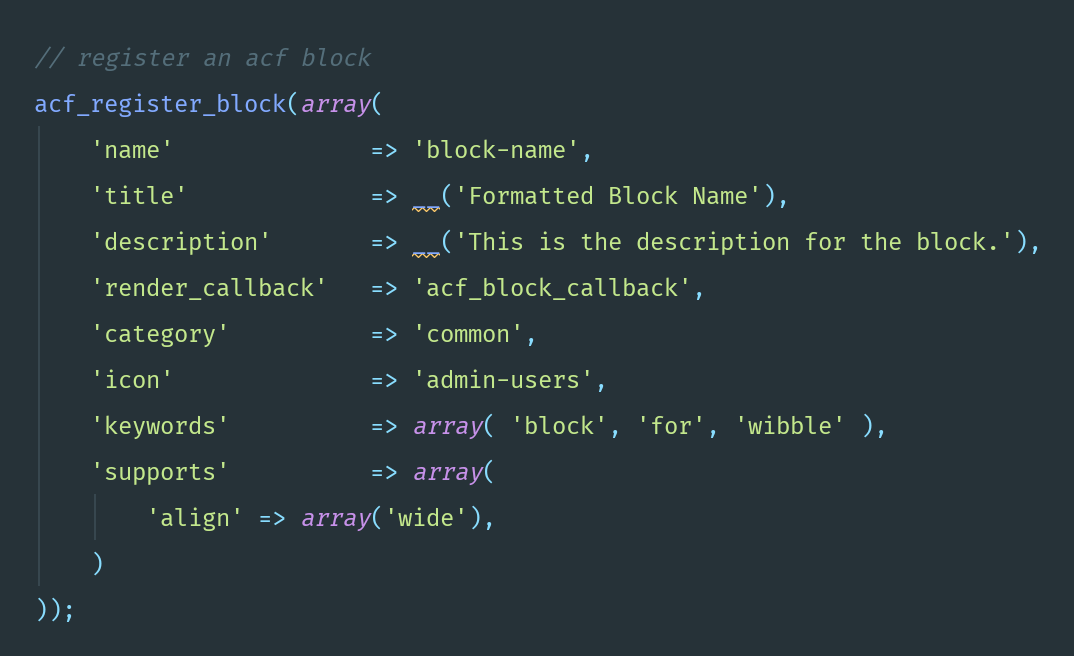
- Create the ACF fields
This is standard practice for creating your standard ACF fields. Go to Custom Fields > Add New, and configure some custom fields. Then, where you would usually specify page rules for where the fields show up, you simply select ‘Blocks’ from the first dropdown. Then, you can choose the block that you registered.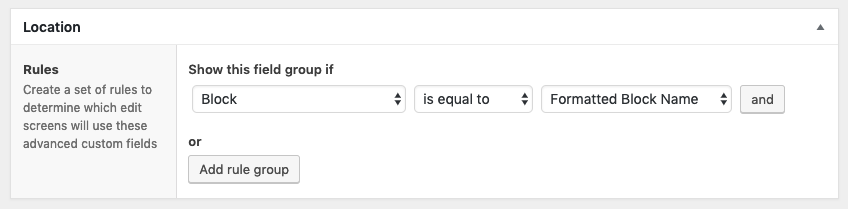
- Setup the block files
The next thing you’ll need to do is setup the block files. You can create a folder for the different blocks you plan to made. Using the function below, ACF can link to that folder and find all the blocks. Then, in the file, you can use PHP to create your block, instead of React. It’s much easier this way.
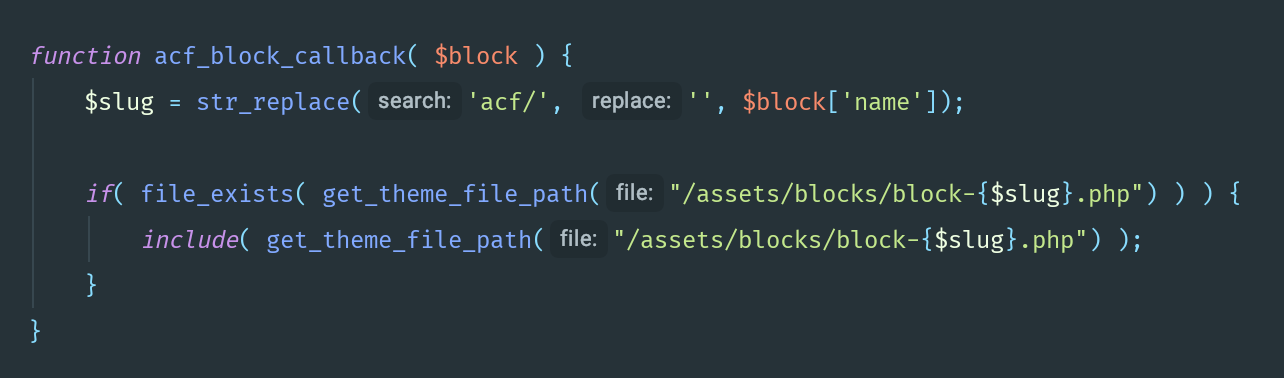
In the acf_register_block function, one of the items in the array is ‘render_callback’. This points to a function that controls what the block actually does on the front-end of the website. As you may have multiple blocks with many lines of code, it’s best to put these in a separate place. In this example, I’m pointing to the assets folder I created. Inside that folder, I’ve created another folder to contain block assets. Then inside the blocks folder, we point to the PHP block file. If we were only going to create one block, we could just put the full path in. But because we may have many different blocks, we’re using the block name as a variable to point to the different block files that we will create.
- Create the block
The only thing left to do now is create the block. The filename of the block will need to matchup to what was declared in step 1. Then, you just put your code in there for what you want to render on the front-end. This can include: HTML, PHP and Javascript. You can get ACF data the same way, using get_field or the_field.
Note: Additional information can be found here & here.
Conclusion
To most of our clients and users of our sites, this new feature won’t effect their website or web app directly as we manage the process and take care of all the development requirements directly.
However, we feel it demonstrates Wibble’s approach to our development process and we are happy to help other web design and development studios with the above demo of how to implement it. We keep up-to-date with how WordPress is developing and we actively update and manage all our web design clients and their web projects who avail of our managed WordPress support.
This engagement of ACF with Gutenberg is certainly a positive for the WordPress community, we see this as a huge step forward for the new editor and are excited to see when ACF takes their plugin over the next 12 months.